Baby Yoda Cupcake
To celebrate Star Wars Day, we bring you this cute Baby Yoda cupcake tutorial! If you have a Star Wars marathon planned, or simply love Yoda (who doesn’t!) get your rolling pins ready and use our step by step guide below to whip them up. May the 4th be with you!
What you’ll need:
Cupcake (using your standard recipe)
Buttercream
Light green fondant / sugar paste
Black fondant / sugar paste
White fondant / sugar paste
Edible glue or water
Tylo powder
Cocktail sticks
Pink petal dust (optional)

Step 1. Smother the top of your cupcake with a small amount of buttercream. If you’d like to core and fill your cupcake first now is the time. Don’t add too much to the top though as it will squish out of the edges when you apply the fondant later! Set aside.

Step 2. Use your rolling pin to roll out the light green fondant (approx. 3-4mm thick) and cut a circle with the 88mm cutter.

Step 3. Place the green fondant / sugar paste circle on top of the cupcake you smothered with buttercream earlier. Use the palm of your hands and thumb to smooth down and around the edges. Once the entire cupcake is covered, you’re done!

Step 4. Add tylo powder to the remaining green fondant / sugar paste (approx. 1 teaspoon per 250g of fondant, adjust as required). Mix well.

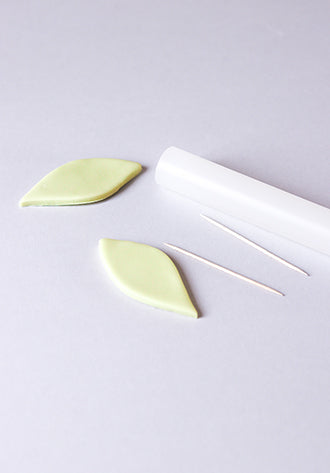
Step 5. Roll the green fondant / sugar paste out using your rolling pin. Either with a sharp knife or a pizza cutter begin cutting two Baby Yoda ears. These should be a similar shape to a leaf and 4-5cm in length.

Step 6. Take your modelling tool (see image for which one) and indent lines into Yoda’s ears.

Step 7. Carefully insert a cocktail stick in each of Yoda’s ears for structure and leave to set for 5-10 minutes. Make sure some of the cocktail stick is still visible as you’ll use these to attach them later.

Step 8. Using the ball tool from your modelling tool set indent a small hole at either side of Yoda’s head. Insert the end of the cocktail stick that’s still poking out of the ear into the hole and use a little water or edible glue to stick. Repeat with the other side.

Step 9. Lightly indent eye sockets into Yoda’s face using the larger end of your ball tool and set aside. Now, using the black fondant shape two eyes by tapering a ball off at one end. Attach with a little edible glue or water.

Step 10. To add a realistic shine paint the black part of the eyes with edible glue after attaching. Now attach a small, white ball of fondant to each eye for ‘pupils’.

Step 11. Now it’s time to attach that cute button nose! Roll a tiny amount of the left over green fondant and fix in place with a dab of edible glue or water.

Step 12. You can indent your Baby Yoda’s mouth using the edge of a plain round piping tip by lightly pushing it into the fondant / sugar paste.

Step 13. It wouldn’t be Yoda without wrinkles (even as a baby!) Add some using a modelling tool, see image for which one we used, with a little light pressure to make sure your fondant doesn’t crack.

Step 14. This one is optional! Add a little blush to your Baby Yoda with a small amount of pink petal dust and a fluffy, food safe brush!

Now you have your very own super cute (and tasty) Baby Yoda cupcakes. Enjoy!

