

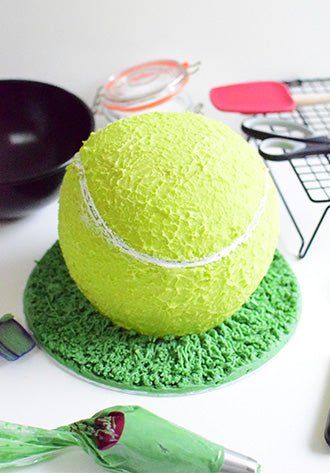
Tala's Tennis Ball Cake
Can’t get to Wimbledon this year?! This red velvet and buttercream tennis ball cake is easy and fun to make for the tennis fan in your life. Serve with orange squash or strawberries and cream for summer birthdays and treats.

Ingredients
For each half sphere cake (you need to make TWO of the following to make the whole ball):
Vegetable oil
3 large free-range eggs
200g baking margarine or softened salted butter
200g caster sugar
250g self-raising flour
1.5 tbs cocoa powder
½ tsp baking powder
2 pea-size blobs of red food colour gel

For the icing:
500g softened butter
700g Icing sugar
Yellow food colour gel
Green food colour gel
White food colour gel
Equipment
Greaseproof paper circle, 25cm diameter (10 inches)
Tala Performance sphere pan, 18cm diameter (7 inches)
Kitchen foil
Kitchen scissors
Tala half sphere food pan
Bread knife
Kebab stick
Piping bag fitted with Tala grass nozzle
- Preheat the oven to 360 degrees Celsius fan (680 degrees Fahrenheit fan).
- Fold the paper circle in half, then in half again (to make quarters) and then in half again (to make eighths).
- Unfold the paper circle. Then, using kitchen scissors, cut two-thirds of the way along each of the fold marks that lead to the centre of the circle. Do not snip all the way to the centre of the circle.
- Using your fingers, grease the ball pan with a drop or two of vegetable oil, then put the greaseproof circle into the pan and overlap the cut fold marks so that the paper lines most of the bottom. Ensure that the area around the top of the pan that is not lined with paper is well greased with vegetable oil.
- In the large mixing bowl, cream the margarine (or softened butter) with the caster sugar until soft and fluffy.
- Add a tablespoon of the flour, then crack in the eggs and mix. The flour will stop the mixture from appearing to curdle to a certain extent, but don’t worry if the mixture doesn’t look completely smooth.
- Fold in the flour and cocoa powder and mix briefly.
- Next make a ring for the cake pan to sit in to stop it rolling and tipping over in the oven. Scrunch a generous length of foil into a long sausage shape and curve it into a ring big enough for the ball pan to sit on. Place the ring on the baking tray.
- Scrape the mixture into the pan, then sit the pan on the ring. Place the baking tray and pan in the centre of the oven.
- Bake for approximately an hour and ten minutes until the mixture has risen and is springy to the touch. A cake tester inserted into the cake will appear to be clean when removed. If the tester has wet cake mixture clinging to it, return the pan to the oven for another five minutes and then test again.
- When fully baked, remove the pan from the oven and leave on the side to cool for ten minutes.
- Loosen the cake from the sides of the pan by running a small shape knife carefully around the edge of the cake. Turn the pan upside down. You should find that the cake comes out easily.
- Allow the cake to cool on the cooling rack, flat side down.
- When the cake tin is cool, repeat all of the steps to make the other half of the tennis ball cake.
While the cakes are cooling you can get started on the icing to fill and cover the cake:
- Use silicone headed spatula to cream the icing sugar and the softened butter to make buttercream.
- Colour 2 thirds of the icing yellow (with a dash of green to make a bright tennis ball colour) and colour the rest of the icing green for the grass.
- Remove the greaseproof paper from both cakes and cut about 1cm off the top of one of the cakes to make a flat surface for the base of the cake to sit on. Place this flat ‘bottom’ on the cake board.
- Thickly spread yellow buttercream over the uppermost flat surface of the cake and place the other half ball cake on top to make a ball shape.
- Using a mini palette knife, thinly spread yellow buttercream all over the outside of the ball, then place cake and board in the fridge for the buttercream to firm up. Don’t attempt to create any texture at this stage, just try to make the icing as smooth as possible.
- Repeat this process twice, until no cake crumbs are visible, and return to the fridge for a few minutes until really firm.
- Create the fluffy tennis ball texture by spreading softened buttercream on the surface of the cake and patting it gently. As you pat the icing and pull upwards, you will notice little spikes of buttercream standing up – this is the fluffy tennis ball effect that you want to create all over the surface of the cake.
- When you have finished, chill for ten minutes or so. Then use a kebab stick to draw the signature tennis ball lines on the surface of the cake.
- Refrigerate again, then use the fine paintbrush to pain white food colour gel onto the inscribed tennis ball lines.
- If you have yellow buttercream left over, add it to the green buttercream and mix until all one colour (adding more green colouring if necessary).
- Now to pipe the grass ‘lawn’. Transfer the buttercream to the piping bag and pipe the grass effect all around the ball and over the board by squeezing the bag and pulling upwards sharply. Chill the cake in the fridge to set the buttercream. Allow to come to room temperature before serving.