

White Chocolate and Raspberry Tart with a Dark Chocolate Crust
This is one of our favourite recipes, partly because it is easy and delicious and partly because it makes great use of one of our prettiest tins: the Tala Performance rectangular tart tin.
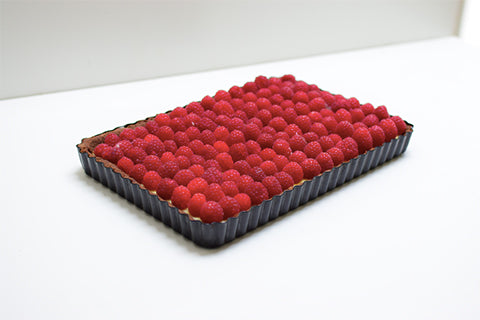
This show-stopping white chocolate and raspberry tart has got it all – wow factor, fresh zingy taste, chocolate, more chocolate... need I say more? It's also very easy to make. If time is pressing, make it in stages: the crust can be made and refrigerated on day one, the filling can be made the following day (just cover loosely with cling film) and the raspberries can be added the next day, either at the very last minute, or they will sit happily on top of the tart in the fridge all day ready to be served up in the evening.
The biscuit bases calls for finely 'whizzed' biscuit crumbs – the easiest way to do this is to pulse them in a food processor but if you haven't got one, pop them into a plastic bag and bash with a rolling pin until the biscuits are crushed into sand.
Ingredients:
1 ½ 266g packs of dark chocolate digestive biscuits (or 24 biscuits), finely crushed
75g salted butter, melted
2 tbs cocoa powder
300ml double cream
2 tsp vanilla paste
525g white chocolate buttons
800g (approximately) fresh raspberries
Equipment:
Tala Performance rectangular tart tin
Silicone headed spatula or wooden spoon
Medium size saucepan

- Set the oven to 160 degrees Celsius (320 degrees Fahrenheit).
- Make the buttery, chocolate biscuit base by placing the biscuit crumbs and cocoa in a mixing bowl. Whisk together briefly so they are uniformly combined. Add the melted butter and mix with a silicone-headed spatula or wooden spoon until you have a damp, dark mass that clumps together when pinched.
- Tip the buttery crumb mixture into the tart tin and use your fingers to spread across the base and up the walls of the tin, trying to get the mixture as even and compact as possible. Work carefully long the walls of the tart tin, making sure the mixture is pushed firmly into the fluted indentations so that the finished tart looks pretty when released from the tin.
- Place the tin in the oven and bake for five minutes, then remove from the oven and check for imperfections (bubbles, slippages...) using the silicone headed spatula to push the crust into place. Allow the crust to cool in the tin and once it reaches room temperature, transfer to the fridge.
- Bring the cream to a decisive boil, but do not allow it to catch, then turn off the heat and tip in all of the chocolate buttons at once. Mix thoroughly, then leave to stand so that the heat has a chance to melt them. Mix again and leave, repeating until the mixture is perfectly smooth.
- Leave the mixture to stand for about 20 to 25 minutes and then transfer to the tart tin, gently pouring the mixture into the chocolate crust, tilting the tin to ensure that it spreads evenly. I say 'gently' to avoid causing bubbles to form on the top – but don't worry about this too much as these will be covered with the raspberries. When the chocolate mixture cools to room temperature, pop the tin back into the fridge and leave for at least two hours before placing the raspberries on the top – any sooner and the fruit will sink!
- Arrange the raspberres in rows, cut into pieces and serve!
Tips:
- Use chopped white chocolate if you can't find buttons
- Line the tin if you want to make it easire to remove the tart – no need, of course, if you are using a Tala Performance tin as it will come out easily with the help of a flat spatula.
- I use vanilla paste because I love to be able to see the tiny vanilla seeds, but if you would rather use vanilla essence, this works very well too.